Friday, December 24, 2010

Merry Christmas!

Merry Christmas to all who celebrate it!

source

Hope your holidays are filled with family and friends and love and wintry goodness!

source

Or - at the very least - adorably skinny reindeer.

We had planned a lovely feast with friends for this evening but had to postpone because of snow, snow and more snow. But, we're cuddling in, watching Christmas movies, drinking hot chocolate and enjoying ourselves anyway! Hope you are, too.

Tuesday, December 14, 2010

Finally putting up some of the hats for small heads.


A pillbox for your little pill. Or a sweet hat for your sweetie. A flowered head topper for your little flower. Aaaand scene.


And I also finally finished up the custom orders on deck and got to start something new for the shop! I'm excited to finish that and show it off...

Sunday, December 12, 2010

My weekend haul.

I enjoyed a very fruitful day on Saturday. I was wandering about a store, lost and unable to find a cart when the rockingest Lancome lady ever gave me her cart and a free gift with purchase - without purchase.

If that wasn't awesome enough, I scored the most perfect red nailpolish. Ever.

NARS Dovima - the most perfect red nail polish


Then we wandered outside the store to a mini Christmas market. A friend had told me earlier in the day that she had found The Most Incredible Chocolate in The Universe. Well, she said, at least, I stumbled upon a booth selling chocolate with a sign on the wall that read "The Most Incredible Chocolate in The Universe".

But, can you confirm this?, I asked. These are the important things in life, folks. And, yes indeed she could. So, having found the mini Christmas market, I once again wandered about lost and in search when El Niño asked what I was looking for. The Most Incredible Chocolate in The Universe, son. A lady looked up, pointed down the way and said it's two booths down on the left. Ha ha ha, that's some chocolate.

The proprietor informed me that I could melt three chocolates in a cup of hot milk for delicious hot chocolate for the kids. Shhhhh!, I said. I mean, really. The kids are thrilled with Nestle. And this IS The Most Incredible Chocolate in The Universe.

The Most Incredible Chocolate in The Universe

Friday, December 03, 2010

New hats!

I put some new hats up in the store today!

I've been wanting to create a hat with some but not too much slouch, and I love the way this one came out.  I like the delicate look of the spaced stitching. While it might not have done the trick for us this morning at a bracing 10°F/-12°C, it would be just perfect in less hardy climes.


slouchy beret listing


I made this hat a while back and I wish I could remember just what I did. I'll have to play around to recreate the look!


two tone beret listing


How cold is it where you are?

Monday, November 29, 2010

Christmas time is near.

It's been cold here in Germany. Very cold. Sehr sehr kalt. (Which I can't say without being corrected by Cheeseball. She still understands a lot more German than she speaks, but what she speaks sounds like actual German. Versus my French-y American German. And El niño's El Deutsch.)

frozen spiderweb
I'm going to pretend I think this spider froze to death and fell off its web instead of the more likely migration INTO MY HOUSE.


Around this time of year, Christmas Markets spring up all over the country. These are heavy with warm, mulled wine (glühwein), potatos fried in various and sundry ways, beautifully carved ornaments & wreaths and the usual tourist junk that accumulates in any fair type setting. This past weekend, we caught the train up to Stuttgart for the Stuttgarter Weihnachtsmarkt. It was full of people, cold and crisp, smelled wonderful and was so much fun. I can't wait to visit other markets in different towns!

Stuttgarter Weihnachtsmarkt 2010

Stuttgarter Weihnachtsmarkt 2010

Stuttgarter Weihnachtsmarkt 2010

Friday, November 26, 2010

Oh, hello there.

Oh good, the blog is still here. I'm not sure what happened, but I lost steam for a while there. In the past few months, we've experienced our first Oktoberfest, gone to Italy, cheered El NiƱo in swim meets wandering across Western Germany, started watching the snow fall and I've started selling crocheted hats!

While Oktoberfest is technically only in Munich, we went to a fall festival with lots of beer and sausage.

Stuttgarter Volksfest 2010


Stuttgarter Volksfest 2010
We drink beer and wear Adidas!


Earlier this month, we went to Lignano Sabbiadoro in Northern Italy at the edge of the Mediterranean Sea. It was a neat little tourist town that is probably packed to the gills in the summer, but was quiet and welcoming at the beginning of the winter. It was a very short trip (although the drive with four kids under ten felt somewhat long) with two days spent driving, one day spent at a swim meet and one day spent wandering Venice.

Venice was amazing. We wandered aimlessly, admiring beautiful buildings that turned out to be things like grocery stores, until we found ourselves passing the same friendly Thai vendor for the fourth time. With phones out of service and the garmin confused by the lack of roads, we ended up buying a map. We explained to the kids what a map was and how in the olden days people were able to find their way with nothing more than a brightly colored piece of paper to guide them. They were in awe. The trip was a lot of fun, and whet our appetite for more exploration.


As I mentioned, I've also started selling crocheted hats. It started with a craft fair here that I submitted a few hats to. Only two sold, but an acquaintance recognized the work as mine and asked me to make a custom hat like one I had made for Cheeseball.

I later added a pink flower to this one.


This was the color scheme requested for my first order. Awesome, no?


Several other people overheard and I've received a bunch of other orders within the same group. I also volunteered to crochet some hats for El Niño's swim team and they sold 6 last week, proceeds going to the team. It's all been so fun and empowering, that I decided to open a store on Etsy. So, that was a really long way of saying...check out my shop!


So, that's three months in a nutshell. Suddenly I realize that I've missed this space and I think that means I'll wander back sooner rather than later next time.

Thursday, August 19, 2010

They may not cover my windows, but they'll do.

I was in the mood to sew something the other day, but mentioned that I was short on fabric for our bedroom curtains. Most of the high-on-my-priority-list projects in my trusty One-Yard Wonders book require some sort of notion like buckles or rings that I didn't have on hand.

While I may not have an immediate need for picnic place mats, I did have some extra Ikea fabric and a desire to get in a little practice. So, I whipped up these cuties, which we can use just as soon as we get a patio set! And next year's warm season!

picnic place mats


They have a little pocket for silverware and a tab to hold a napkin. Once we tuck those in, we can roll them up and pack them in our picnic basket. That we also don't have. But might! One day!

picnic place mats


picnic place mats

Tuesday, August 17, 2010

My closet is for the birds.

When I went looking for the post I originally wrote when I bought what I will eventually get around to talking about, I realized I bought this lovely wall decal in January. Well, a mere seven months later, I got around to putting it up on the wall. Sort of. I put it on my closet.

vinyl wall decal, not on the wall

Isn't it pretty?

Then, I sat down to sew some curtains for our bedroom. Right now, we have to lean out and close the shutters. I realized that with the way the print flows on the fabric I have, I'll need another two yards to cover the whole window. Well, another two meters.

So, I sewed something else instead and I'll get around to putting that up here in less than seven months.

Sunday, August 08, 2010

Shameless Self Promotion

Which, really, what else is a blog for!?

My blog partner, Alicia, over on our craft blog Team Awesome has created an absolutely adorable corduroy bag and we're giving it away this week!


Hop over to Team Awesome and enter to win! You can comment, tweet or Facebook (or all three!) to enter.

Friday, August 06, 2010

I never promised you a rose garden.

Do you remember that song? It was one of my mom's favorites when I was a child. Just humming it in my head takes me to a happy place!

I'm not usually a rose person, but these bright yellow girls just begged to be brought home.

roses and a bilora bella 66

Cheeseball's New Armoire

Hoorah! Hooray! Today is a day to celebrate! I've finally finished a project that has been rolling around in my brain for at least 6 months. And it feels soooo good.

Cheeseball had a dresser that was very cute when we first got it, years ago, but had fallen into a pretty sad state of disrepair. I'm sure it could have been fixed, but with her Ikea wardrobe necessitated by the lack of built in closets in German houses, she really didn't need dresser drawers anymore. So, I wanted to transform the old dresser into an armoire for doll and barbie clothes. And with a little fabric and about a gallon of mod podge, that's exactly what I did!

doll armoire - before
The dresser in all it's previous abused-by-a-four-year-old glory.


First, I removed all but the bottom drawer.

doll armoire - before


Then, I took out the hardware and removed the top of the dresser.

doll armoire - before


And this is where my nice, handy step by step pictures come to a screeching halt. I used mod podge to apply the fabric to the inner walls and underneath the top of the dresser. I realized that the side walls were so thin, any hanging rod hardware was going to come through the other side. So, when I had the wood for the base of the armoire (over the bottom dresser) cut, I drew some hearts on to the scrap wood and they cut those out for me as well.

hearts


Again using mod podge, I covered the hearts with the two coordinating fabrics I had picked from Heather Bailey's completely lovely Nicey Jane collection. Then, while hanging the Ikea Deka curtain rods, screwed through the side walls and right in to the wood hearts.

doll armoire


The last step was sewing the curtains. And voila!

doll armoire


doll armoire
Peeking in.


doll armoire


Unfortunately, the back of the dresser is multi piece, very thin and only connected on the extreme sides. I should have reinforced that somehow before applying the fabric, because you can see some pockets where the fabric meets nothing. I'm a little bummed about this.

We're using big clothespins right now. But, my friend Alicia was kind enough to pick up some mini clothespins for me because I can't find them here or anywhere online that will ship to an APO. When those get here, I plan to cover them in washi tape and then they'll be perfect for a teeny tiny doll armoire.

We're also using cereal bowls to corral Barbie shoes, doll shoes, Barbie purses, etc... But, maybe future renovations will effect a solution for those as well.

Cheeseball and I are both so pleased with how this came out! I'm discovering a great love for upcycling and transforming and this was the perfect candidate to make new.

Thursday, August 05, 2010

Coming soon to a Sushi near you.

Just a little sneak peek of something I've been working very hard on that I hope will be done and ready to share tomorrow!

sneak peek

Tuesday, August 03, 2010

Making Allowances

El Niño and Cheeseball have been earning a regular weekly allowance for a while now. We follow the pretty common $1 per year of life formula, and it's worked out well for us. As a general rule, we'll buy whatever books and craft supplies they might want, but we don't buy toys outside of birthdays and Christmas, so they really look forward to their allowances.

Having moved to Europe, the allowance situation has gotten a little more complicated. In America, we'd just give them their dollars in cash every week. But, in Germany, they need dollars to spend on post - where the game cartridges work in their players, the instructions come in English and their favorite things (namely Legos and Barbies) can be found in abundance. But, they need euros to spend off post - where they are the majority of their time. Since they have to buy their own toys, trading off weeks in dollars and euros would make it take twice as long to save up for anything specific they want. And, Mom has a hard enough time keeping dollar and euro cash separate and organized, they don't need to have to maintain two wallets!

So, we've moved to an overly complicated Excel spreadsheet factoring current exchange rates, allowance payments and money spent to come up with a constant balance in both dollars and euros. Which is very handy! Except when you're at a store and the kids want to know how much money they have and you forgot to pull up the spreadsheet before you left.

So! I created two balance books for them. We'll copy the balances in as they are updated, and the kiddos will be responsible for keeping track of the books.

allowance balance books


I'm not posting a printable, as it's unlikely many people will need separate dollar and euro columns in balance books for their own kids! But, a simple table with dates and balances are all you need if you want to create a similar system for you and yours. Design a cardstock or heavy paper cover, fold it all in half and staple at the center!

Monday, August 02, 2010

Mini Memory Games

When I saw this adorable tutorial by dandee, I knew I had to make some mini memory games up for the kiddos.

Since I don't have access to the normal craft stores here in Germany and couldn't get my hands on the little tins she used, I sewed up some very simple drawstring bags to hold the games.

memory game


I started with vintage animal clipart from the Graphics Fairy, which I made into colorful silhouettes in Photoshop.

memory game


And used a retro graphic paper for the backs.

memory game


Then, I remembered some adorable doodles done by Joel over at Made By Joel for a matching game. (Are you reading Made By Joel? You should be, the toys he makes for his kids are wonderful!)

memory game


And used a black and white polka dot for the backs.

memory game


The kids are having a blast with their new games! And, they're the perfect size to toss in your purse and have at the ready when waiting for service at a restaurant or whenever some waiting time pops up!

If you'd like to make your own, you can hop over to dandee for the tutorial, and download the pictures I used here.

Sunday, July 25, 2010

What's for dinner July 25, 2010

I have a long lived love (say that three times fast!) for all things miniature. When I was a girl, I went through a phase where I would rush out and agonize over which teeny tiny little dollhouse accessory to blow my allowance on. And while I intend to build myself Cheeseball her own dollhouse at some point, for now I content myself with making big things small. Tiny little cookies in tiny little boxes. Teeny little bowties on little knitted coffee sleeves. And, tonight...teeny little burgers on mini little buns.

mini burger and homemade fries


These are a lot of fun for a party. We've put on a mini burger bar before with all the fixings you can think of - different kinds of cheeses, bacon, avocado, sauteed mushrooms, veggies, sauteed onions, etc... - so everyone can try several different combo burgers without filling up too fast.

But, they're also fun for an evening at home with the kiddos. I made two different kinds of burgers.

raw burger...yuck
Raw hamburger...less than appetizing.


On the left, I took a quarter kilo (which I think is about a half pound) of ground beef, pressed a big clove of garlic over it and drizzled some olive oil. I added about a third of an egg. Then, I ground some sea salt and pepper and scissored some fresh basil with my new toy.

How badass are these!?


In the burger mixture on the right, I made my patented World Famous Burgers, known to at least 10 or 12 people. I just eyeballed the ingredients, since it was such a small amount of meat. But, I'll include the recipe at the end of the post.

This was the first time I'd tried the basil, and they came out well! They're even kind of pretty when cooked.

basil burger
Well, as pretty as hamburger gets.


I chopped some mini fixins.

mini burger fixins


For our mini burger bar party, I used frozen dinner rolls, since they're so nice and perfectly round and look just like "I'll gladly repay you..." Wimpy's burgers. But, defrosting and rising the rolls was more trouble than I was going to go to for a Sunday evening Q with the fam. I just toasted up some dinner rolls.

grilled mini burger buns


I sliced yellow potatoes, and tossed them in peanut oil in our mini-fritteuse (which I believe is called a deep fry to the rest of us), then seasoned.

homemade fries


Yummy, teeny tiny and fresh. What more could I want?

World Famous Sushi Burgers

1 1/2 lbs 80% lean ground beef
1/2 a smallish onion, finely chopped
1/2 cup cheddar cheese
1/2 Tbs soy sauce
1 Tbs worcestershire sauce
1 egg
1 envelope Lipton Beefy Onion soup mix
2 cloves garlic, minced
salt and pepper, to taste

Thursday, July 22, 2010

Rapid fire gift giving.

When we dropped Cheeseball off at kindergarten this morning, I learned that although school isn't over for the year until mid-August, today is the day they do gifts to the children and the children bring gifts for the teachers. Wait, what!?!?! This is the last week of German grade school for the year, so families start going on vacation next week, taking their kindergarteners with them.

Well, this left me with nothing to do but speedwalk/sprint home and start brainstorming. I was going to consult a German friend to see what would be the typical kinder-to-lehrer (teacher) end of year gift. But, then I thought wait...when I have friends from exotic places, I don't want them to bring me whatever I'm used to! I want to check out whatever they're used to. So, I decided to bake something American. Apple pie would be a little tough to wrap up and transport and also I suck at it. What's more American (though, less American than apple pie) than chocolate chip cookies!?

Unfortunately, the move and corresponding gutting of the kitchen for the movers still has us a little low on staples. The baking soda, the brown sugar, the flour, really everything is different here and the Internet told me you can't mix American baking recipes and German ingredients. So, I had to drive to post and by then, it was time to bite the bullet and buy ready made cookie dough.

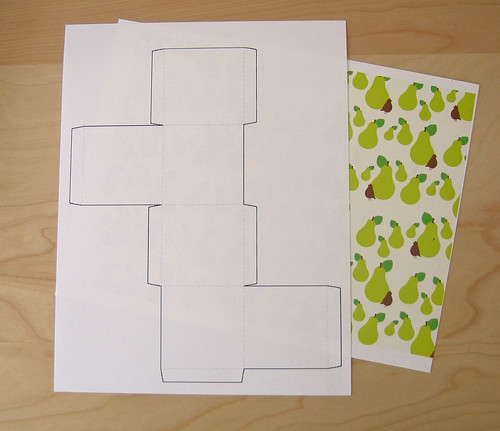
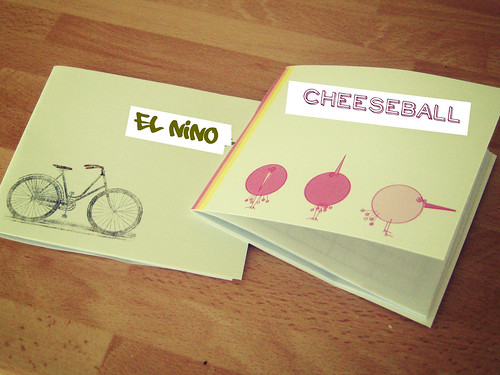
But, the packaging could be homemade! I downloaded some box templates and used an adorable wrapping paper template by Kellie Medivitz that I'd saved previously.

Download the box templates here.

Download the tags and wrap here.

I printed the wrapping paper print on one side of cardstock and the box template on the other.

gift box in the making


Then, used craft glue (even though craft glue and mod podge both claim to be non-toxic, the craft glue seemed even nonner-non-toxic to me) to line the inside of the box with wax paper.

gift box in the making


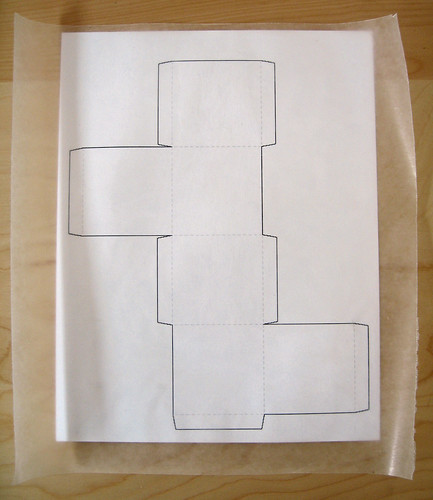
I cut the wax paper off the flaps and scored the dotted lines. Then, put the box together! I recommend gluing flap by flap as you go - both so that the glue stays fresh and because until you're putting it together, it's tough to figure out which flaps you're going to want to glue on the inside and which on the outside.

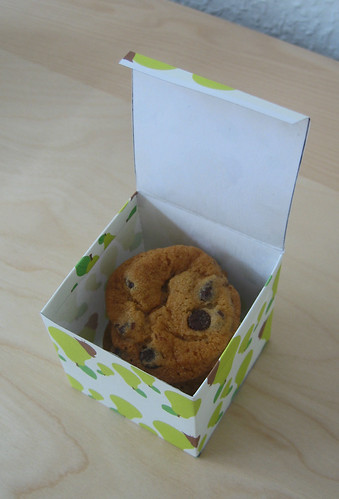
I had cut the pre-made cookie dough squares in half to make smaller cookies. I stacked the cooled cookies inside the boxes.

cookies in a box


Then, closed them up, tied a pretty ribbon and attached a coordinating gift tag.

kinder gift


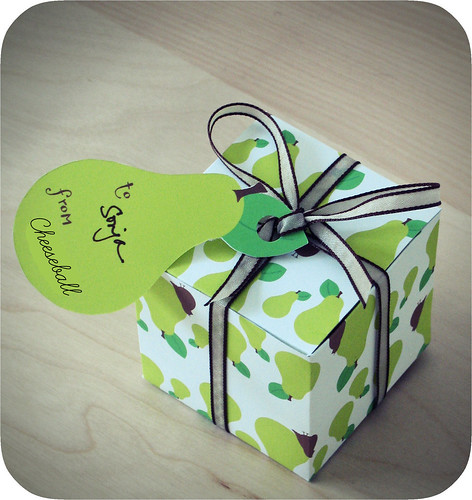
All in all, I thought it was a pretty cute, very last minute and with limited supplies kind of gift!

And, the teachers asked "sind diese amerikanischen cookies!?" and they seemed pretty excited about it. So, I think bringing an American gift from their American kinder was the way to go.

Although I ended up having to use pre-made cookie dough, I'm posting my totally awesome chocolate chip cookie recipe anyway. I use a half a bag of chocolate chips in these, and the girl who originally gave the recipe to me uses a bag and a half, so go with your own chocolate lover level.

2 sticks butter, softened
3/4 cup white sugar
1 cup brown sugar
2 eggs
1 tsp vanilla (or better yet, scrape the inside of one vanilla bean)
2 1/4 cups flour
1 tsp salt
1 tsp baking soda
1 tsp cinnamon
1/2 bag semi-sweet chocolate chips

Preheat oven to 350. Cream together butter and both sugars. Add eggs and vanilla and beat until smooth.

Combine dry ingredients in separate bowl. Slowly add to egg/sugar mixture. Stir in chocolate chips.

Bake 10 to 12 minutes. Enjoy.